Tubular skylights
Hatch lids
Openable skylights
Roof windows
Installation Guide
How to Install a Skylight Flexible Kit
Flashing Your Skylight
Contents of your kit include:
- DOME & FLASHINGS
- FLEXIBLE SHAFT
- CEILING SURROUND
- PRISMATIC DIFFUSER
TILE ROOF
REMOVE BATTENS TO SUIT THROAT SIZE OF SKYLIGHT |
1. Remove amount of tiles and cut tile battens, (box out if necessary), to suit the measurement of the throat of your skylight. Position at your chosen location on roof. Place skylight over opening on roof, tray must sit under top row of tiles, tray should be sitting on rafter and battens, nail or screw shoulder of tray to timber underneath. Allow flexi duct to drop into roof cavity. Smear dobs of silicon over screw heads to prevent leakage. Replace tiles over shoulders, some of them will need to be cut to allow them to sit flat. Press lead down over tiles at bottom of skylight. 2. Get inside roof cavity; line up duct with where you want ceiling surround to be fitted into plaster, drive nail marker in the centre of proposed square. Remove ceiling battens with saw and box out if necessary. Working from underneath on ladder, place ceiling surround in desired position and mark with pencil around outside of t-sect upright, check if your pencil lines run symetrical with cornice. Proceed to cut out plaster, so ceiling surround can fit snug inside your square. |
CGI ROOF
EXTEND SLITS EXTRA 70MM AS ABOVE |
1. Firstly get inside roof and drill hole into roof top for desired positioning, same with plaster ceiling.With tin snips or shears,cut roof iron the size of the throat of the skylight, making top cuts extend an extra 70mm, so skylight slips under the top cuts on roof and rests on sides. Cut back roof battens to match your skylight throat size. Do not cut roof trusses as these are load bearing beams.
Proceed with step 2, as per tile roof instructions above. |
Fitting Ceiling Surround and Attaching Flexible Duct
Fitting Your Prismatic Diffuser Panel
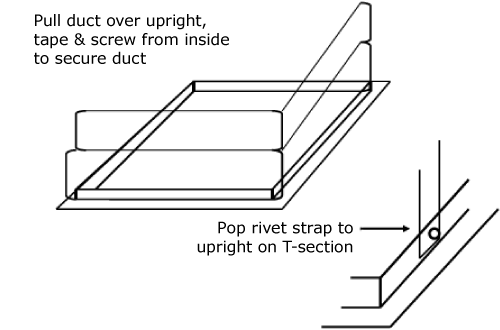
- Pop rivot metal strap to upright of t-section on ceiling surround. Brace to nearby roof timber, one or two straps per side.
- Screw horizontally into the corners to secure flexible shaft.
- Pull flexible shaft over t-section upright. Wrap duct tape around to secure. Lastly, turn diffuser panel sideways and raise into hole, lower it down to sit inside ridge, rough side facing downwards.
|
|


